
How to set up WSUS on Windows Server 2012 R2 – A Step-by-Step Guide
Contents
- Why WSUS?
- What you need:
- Step 1:
- Step 2:
- Step 3:
- Step 4:
- Step 5:
- Step 6:
- Step 7:
- Step 8:
- Step 9:
- Step 10:
- Step 11:
- Step 12:
- Step 13:
- Step 14:
- Step 15:
- Step 16:
- Step 17:
- Step 18:
- Step 19:
- Step 20:
- Step 21:
- Step 22:
- Step 23:
- Step 24:
- Step 25:
- Step 26:
- Step 27:
- Step 28:
- Step 29:
- Step 30:
- Step 31:
- Step 32:
- Step 33:
- Step 34:
- Step 35:
- Step 36:
- Step 37:
- Step 38:
- Step 39:
- Step 40:
- Step 41:
- Step 42:
Heads up (as of November 2026): This guide is from 2015. Windows Server 2012 R2 reached end of support in October 2023, and Microsoft has since announced that WSUS itself is deprecated. It still works and still ships with Windows Server, but it won’t be getting any new features. If you’re starting fresh today, it’s worth looking at Microsoft’s newer options like Windows Autopatch or Intune before going down this road.
Windows Server Update Services (WSUS) is a free patch management tool by Microsoft. It allows sysadmins to centrally push Microsoft product updates to computers that are running Windows on their network.
This guide will help you set up your very own WSUS server on Windows Server 2012 R2.
Why WSUS?
How do Windows computers usually update? In a non-WSUS environment (generally all home environments), each PC independently connects to Microsoft Update to get its patches and MS product updates.This may not be always preferred in a corporate environment. Instead of each workstation manually connecting to Microsoft Update, testing updates and then deploying updates using traditional methods, administrators can use WSUS to download updates centrally to an internal server. Once updates are authorised in WSUS, they’re also deployed internally and reporting tools keep administrators informed of patch progress. This is a very efficient way of working, allowing administrators full control of which updates are deployed to workstations.
In Windows Server 2012 and 2012 R2, WSUS is integrated with the operating system as a server role. In previous versions of Windows Server (2003, 2008, 2008 R2), you had to separately install WSUS 3.0.
Also, seems like Microsoft will be moving away from WSUS to an entirely new product called Windows Update for Business (WUB). You can read more about it here.Ok, so now, let's see how we can set up WSUS on Windows Server 2012 R2
What you need:
- A machine with Windows Server 2012 R2 installed
- Internet connection
- 20 minutes (not including download times)
Step 1:
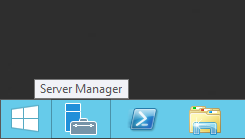
On your Windows Server 2012 R2 machine, launch Server Manager as shown below.You can either launch it using the icon in the taskbar or you can click the Start button and just search for “server manager”.
Step 2:
Once Server Manager is open, select Add roles and features.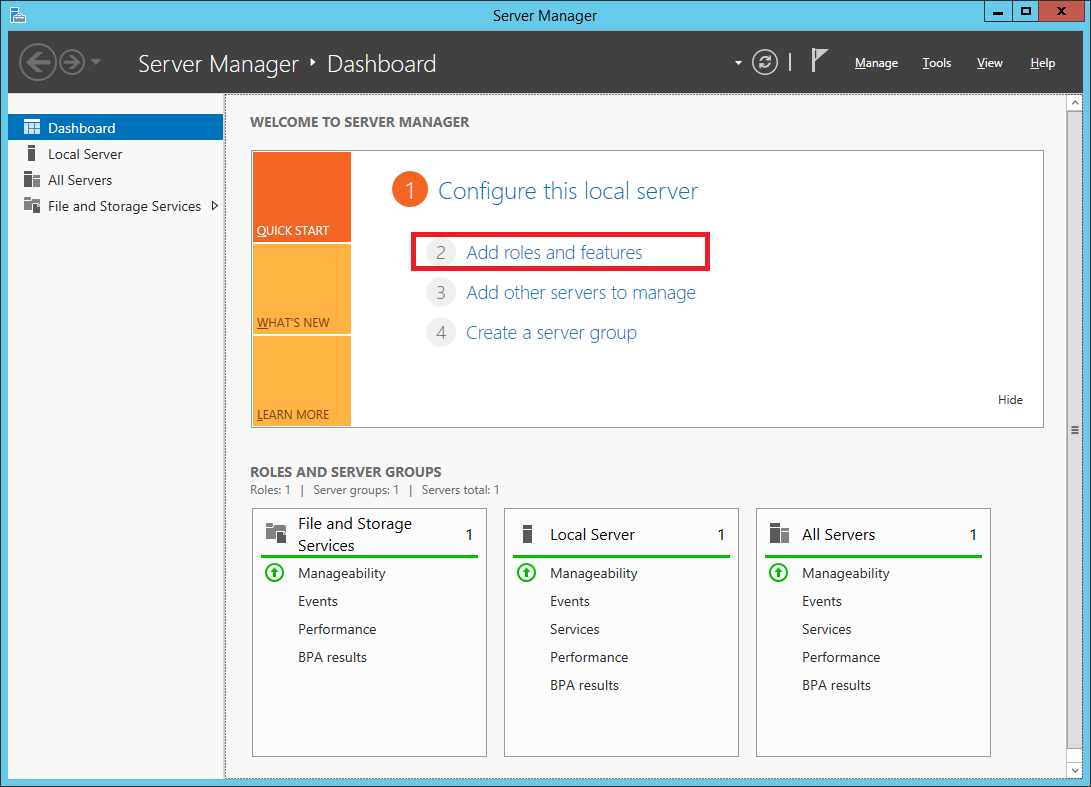
Step 3:
In the Add Roles and Features Wizard, click next on the Before You Begin page. You can optionally select to Skip this page by default for the future.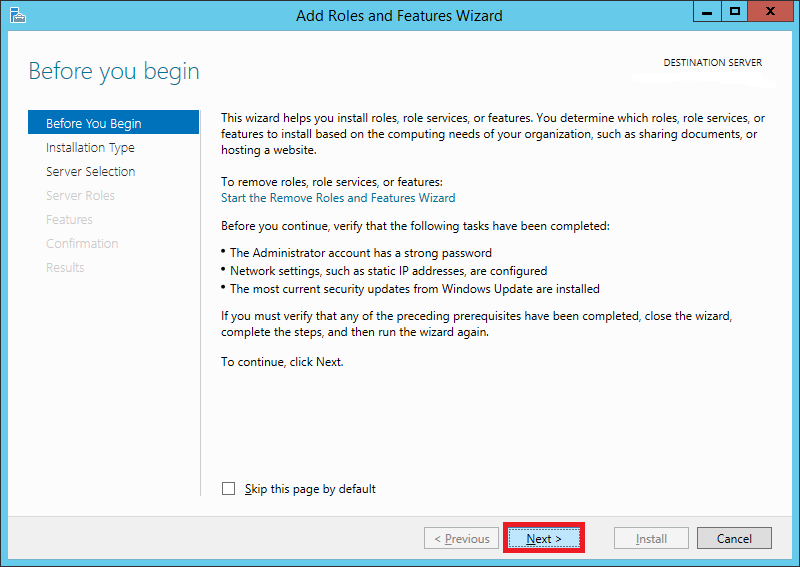
Step 4:
Select Role-based or feature-based installation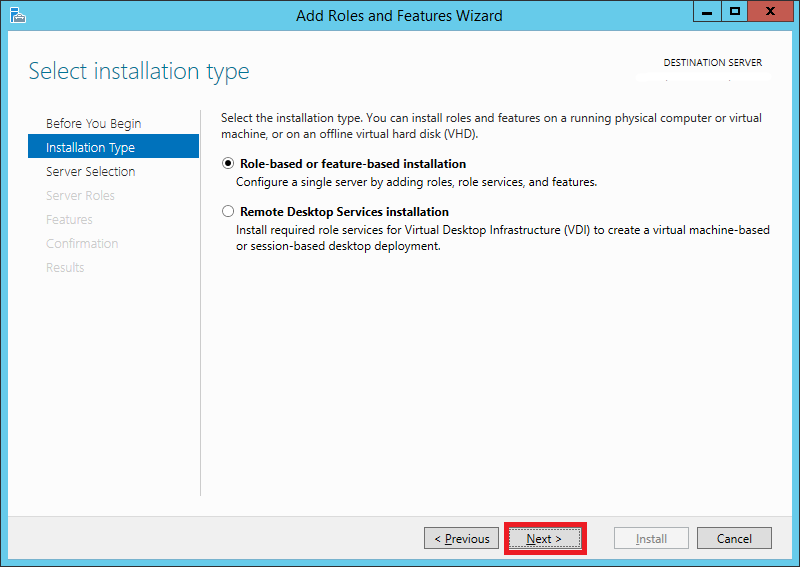
Step 5:
Select your server from the server pool. If you're not using Hyper-V, you will see only one server, i.e., your soon-to-be WSUS server.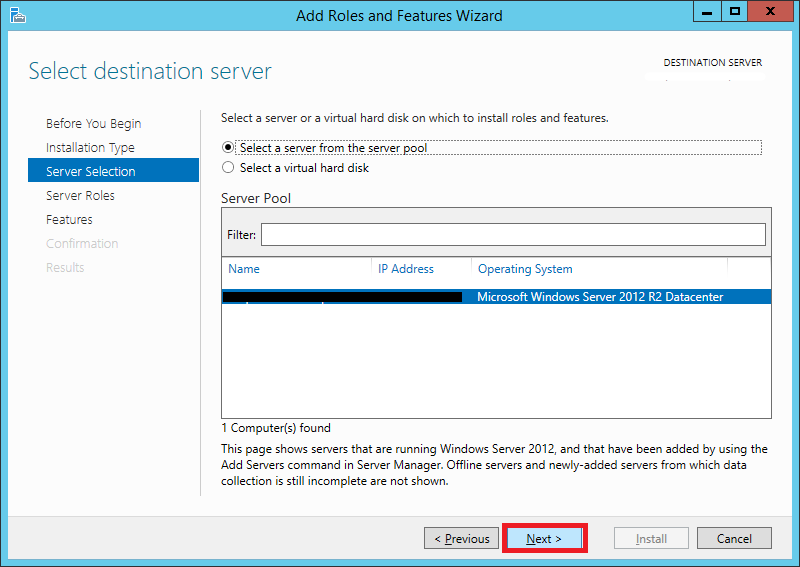
Step 6:
In the Server Roles list, scroll down and select Windows Server Update Services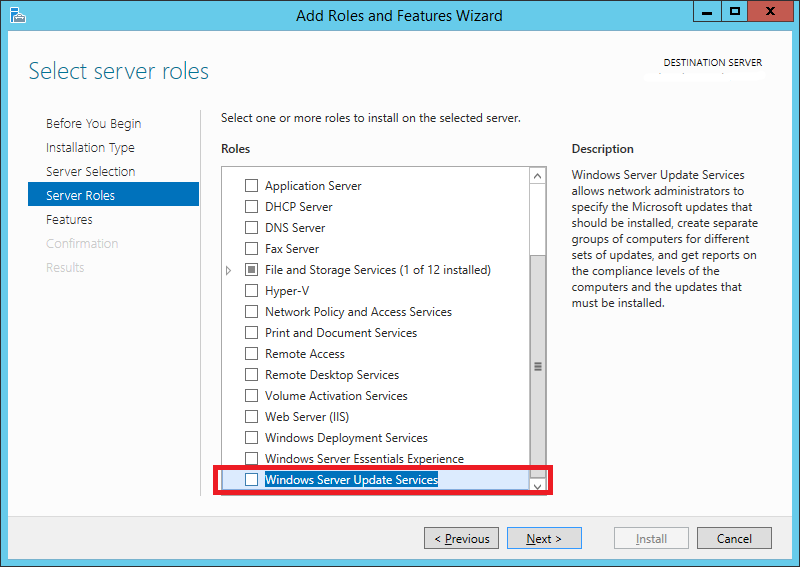
Step 7:
A window will pop up showing you the features that are required for WSUS which will be enabled. Click Add Features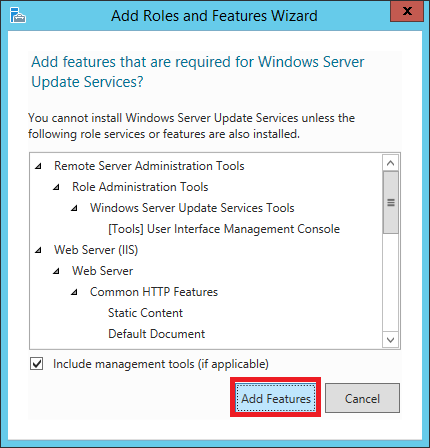
Step 8:
You will notice that IIS has been automatically selected. Leave everything as default and click Next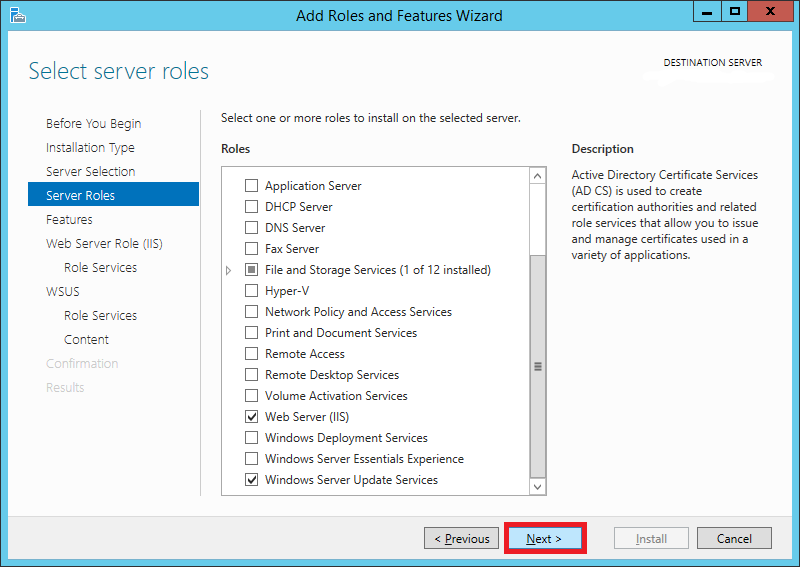
Step 9:
On the Features screen, leave the default selections and click Next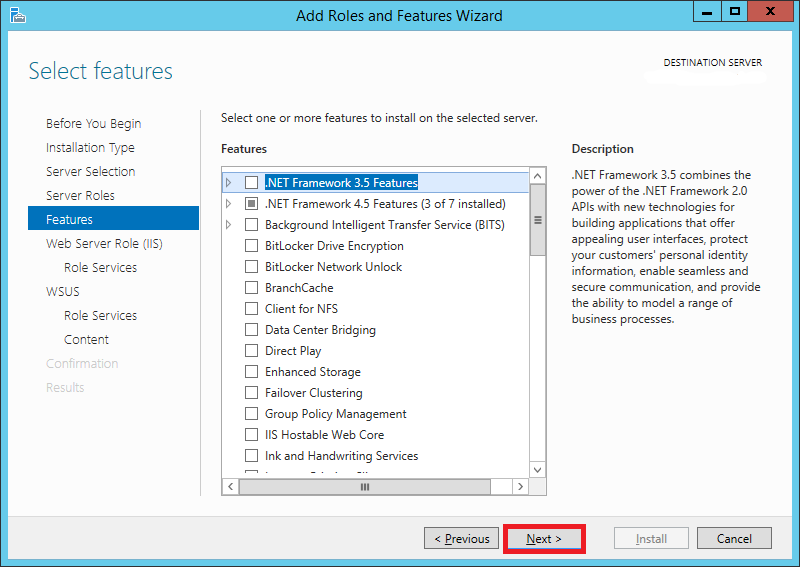
Step 10:
On the Web Server Role (IIS) page, click Next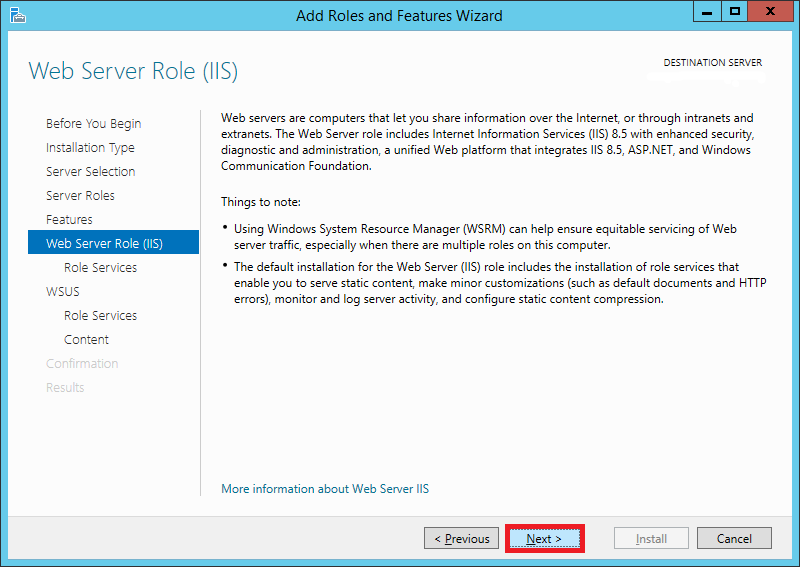
Step 11:
Leave all selections as default on the Role Services page and click Next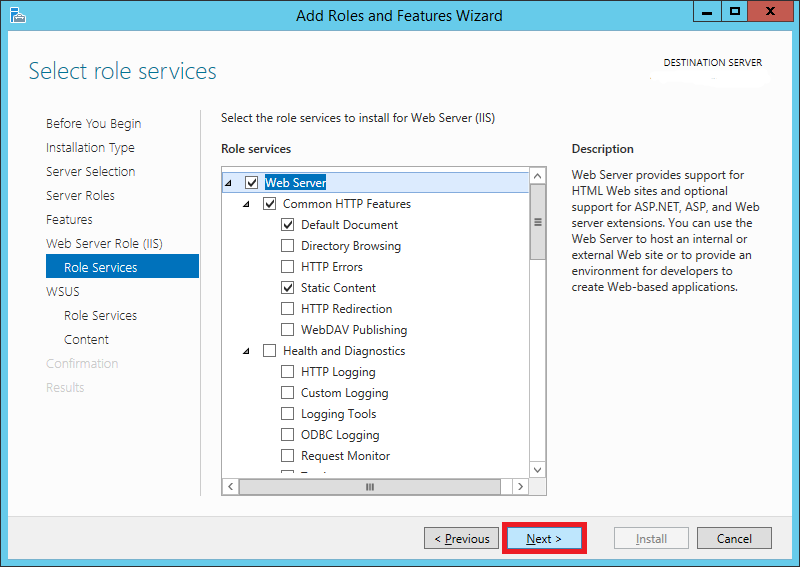
Step 12:
Click Next on this screen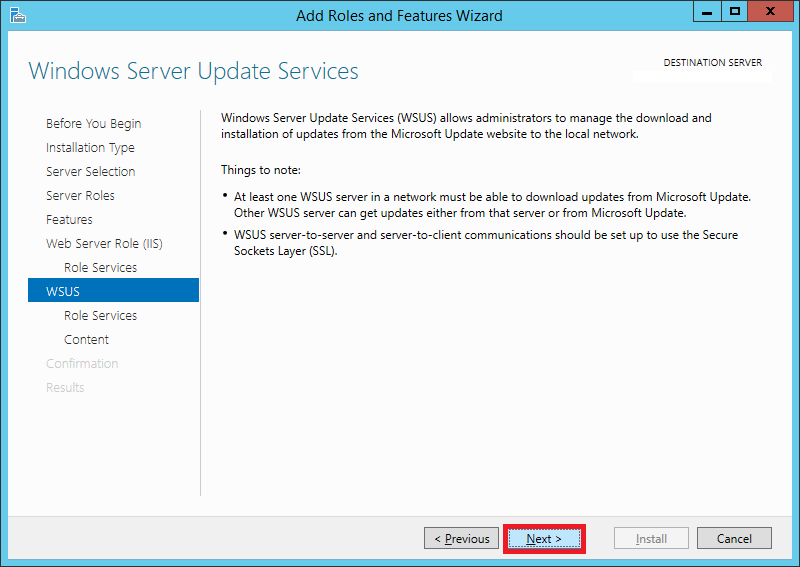
Step 13:
On the Role Services page, make sure WID Database and WSUS Services are selected (They should be selected by default). Click Next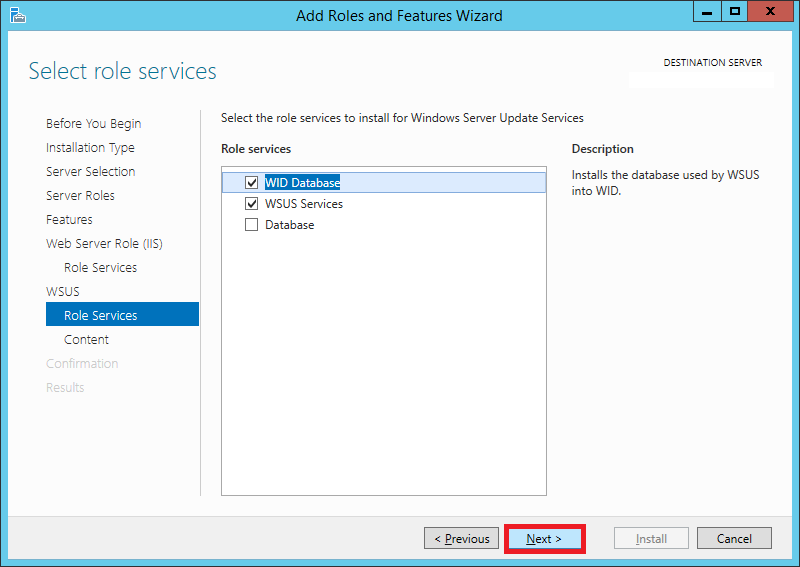
Step 14:
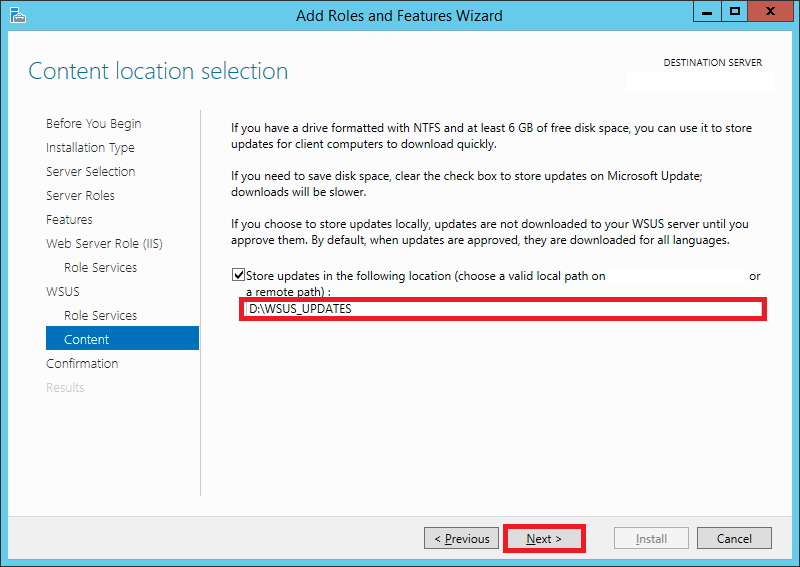
This page will allow you to set the destination directory for the downloaded updates. Tick the checkbox for Store updates in the following location.Enter the path here. It can either be a local or a remote path. Keep in mind that WSUS will take up considerable amount of storage as time goes on. It is not unusual to find update folders of sizes greater than 100 GB.
Choose your destination accordingly.
Step 15:
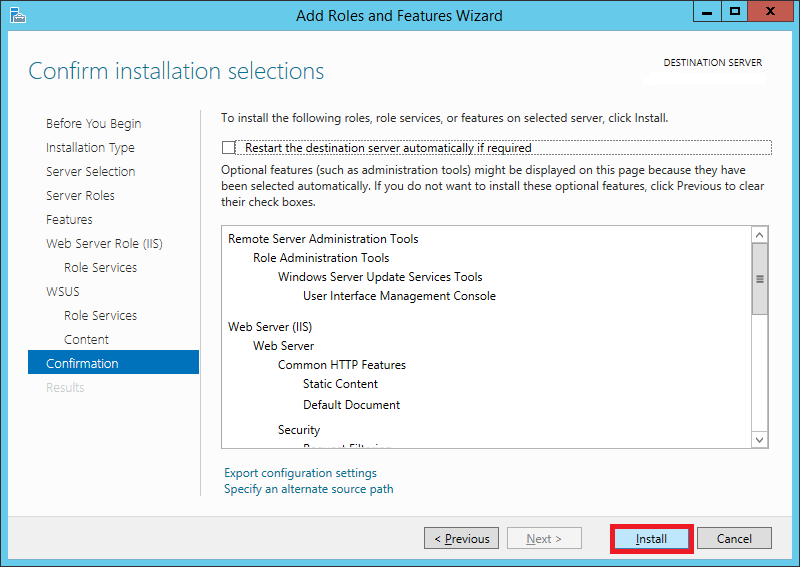
On the Confirmation screen, check the Restart the destination server automatically if required option if you wish to do so, otherwise you can leave it unchecked.Click Install
Step 16:
Sit back and grab a coffee. This will take about 5-10 minutes.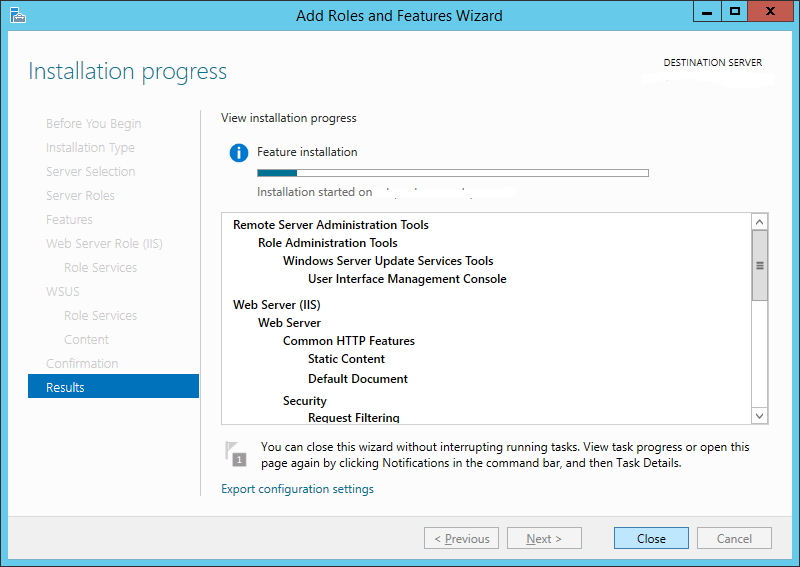
Step 17:
Once it's installed, hit Close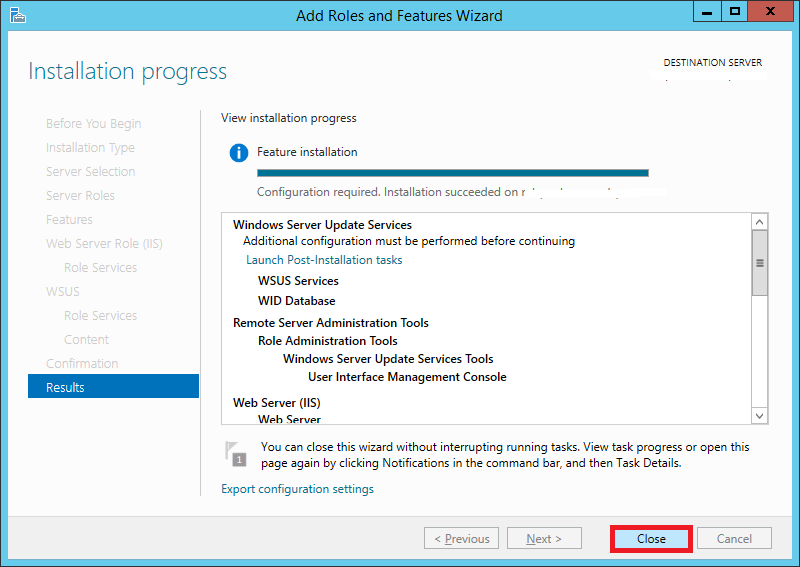
Step 18:
Search for WSUS or Windows Server Update Services and launch it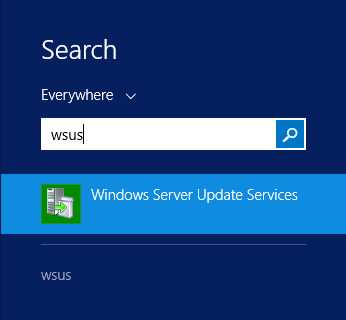
Step 19:
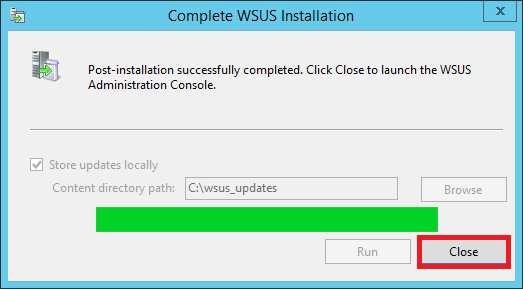
Since it's the first time you're opening it, it'll take a while to set up. Wait for it to complete and then hit Close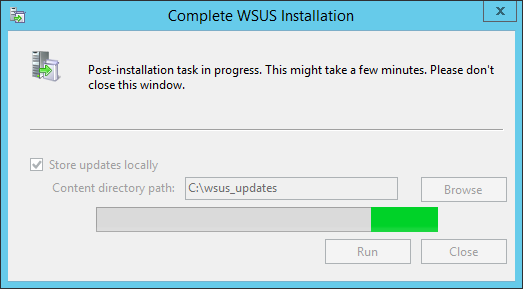
Step 20:
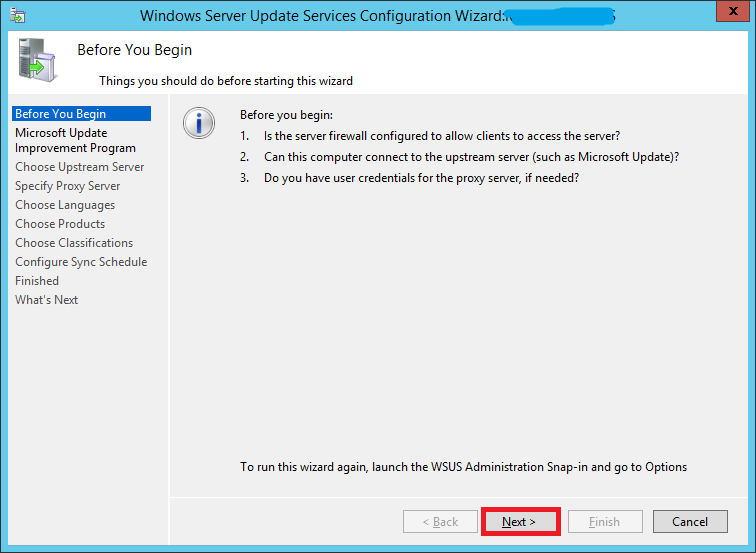
You will now see a wizard that will walk you through a series of steps to configure your installation.Before starting, make sure of the following:
- Confirm whether the PCs on your network can communicate with this server.
- Your WSUS server should be able to communicate with Microsoft Update (Make sure your firewall isn't blocking it)
- If your environment uses a proxy, make sure you have the proxy server credentials before continuing.
Step 21:
If you would like to join the Microsoft Update Improvement Program, check the box. Otherwise uncheck it. Click Next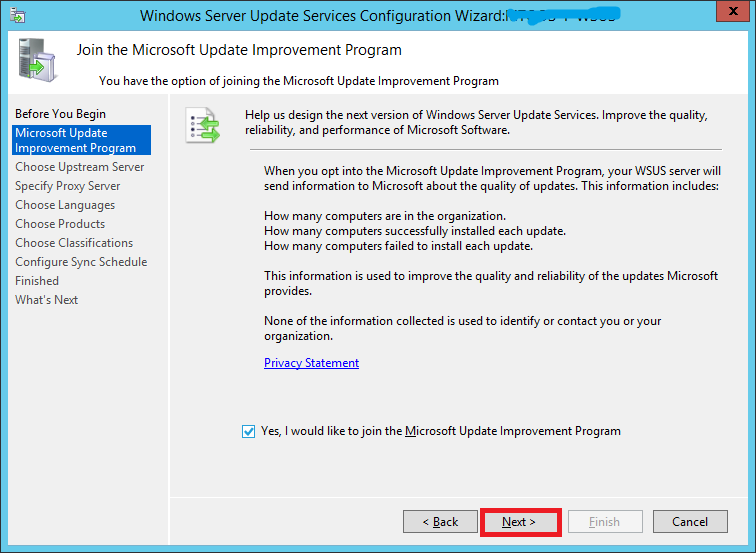
Step 22:
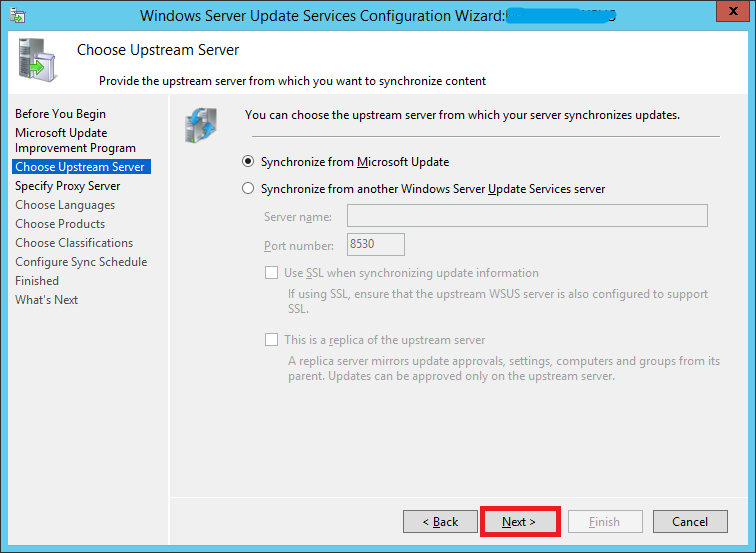
If you want to sync updates directly from Microsoft Update (the most likely scenario in your case since you're reading this guide), enable the first option and click Next.If you already have a WSUS server in your environment and want your new WSUS to sync updates from that instead of Microsoft Update, enable the second option.
- Enter the server name and port number (For WSUS on Windows Server 2012 R2, the default port is 8530)
- Enable/disable SSL based on your environment
- Decide whether it is going to be a replica server or not and click Next
Step 23:
If you use a proxy server, enter the details here, otherwise leave the checkbox unchecked and click Next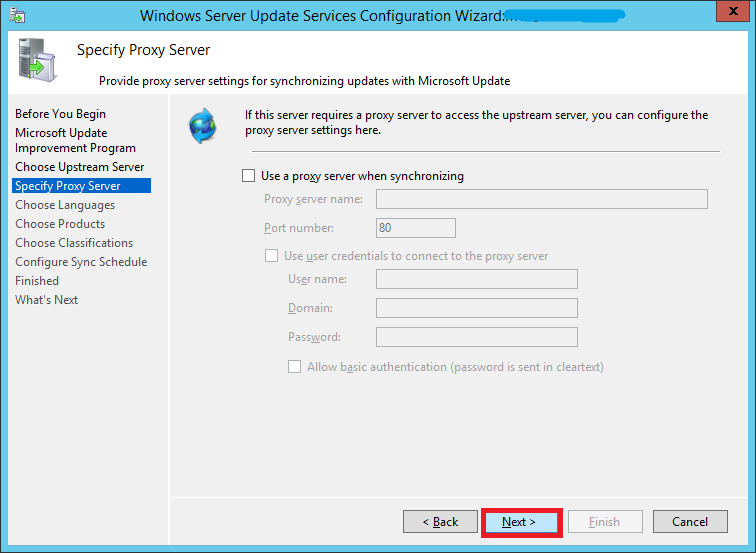
Step 24:
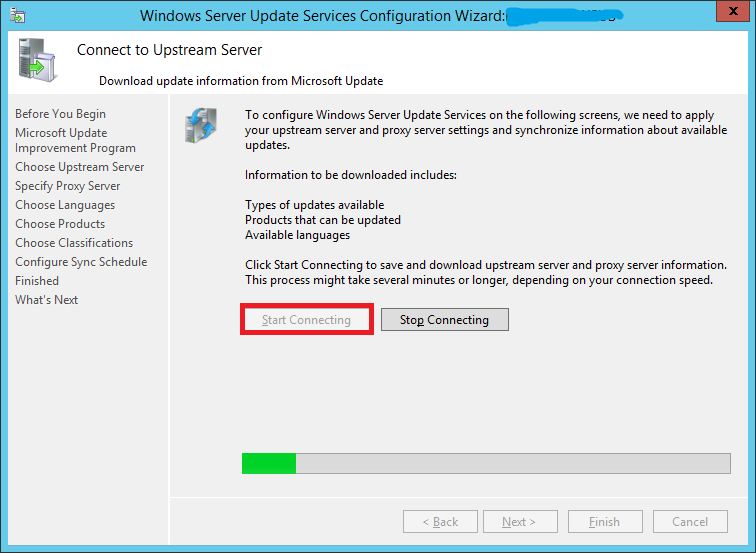
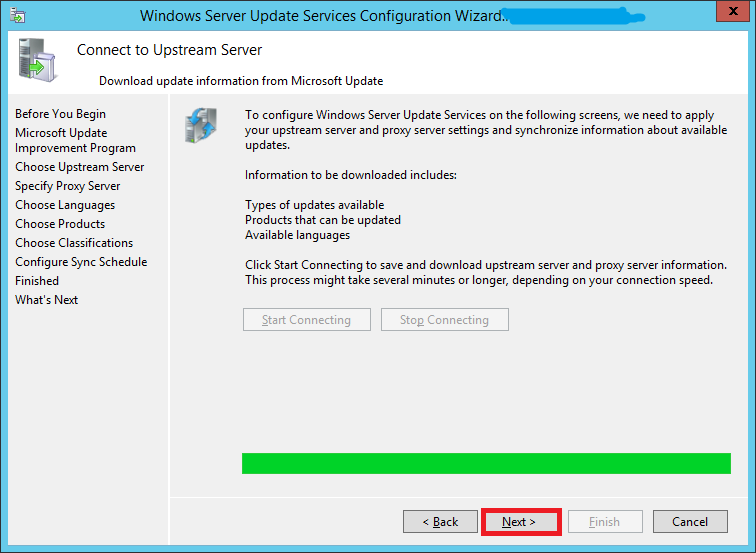
Your server will now need to connect to Microsoft Update and find out information about all available updates.Click Start Connecting. This might take up to 20 minutes or more depending upon your connection.
Once it’s done, hit Next
Step 25:
Choose which languages you need updates for and click Next. You can always modify this later.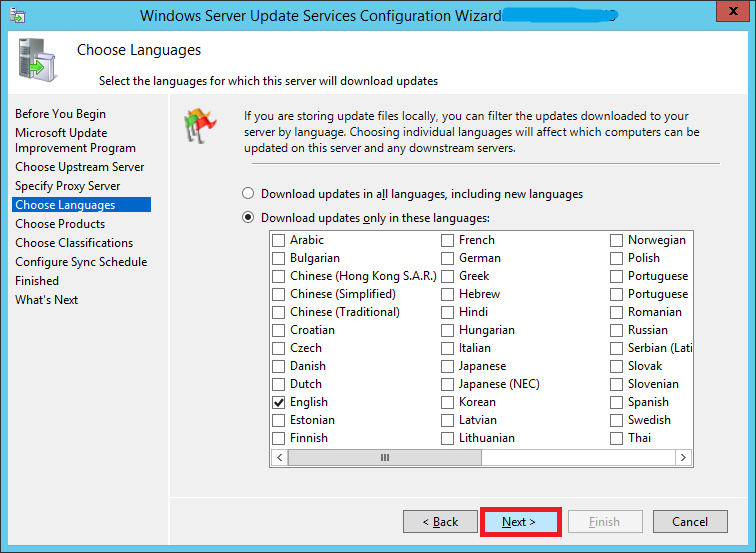
Step 26:
The Choose Products screen will allow you to subscribe for updates for different Microsoft products.After selecting your products, click Next
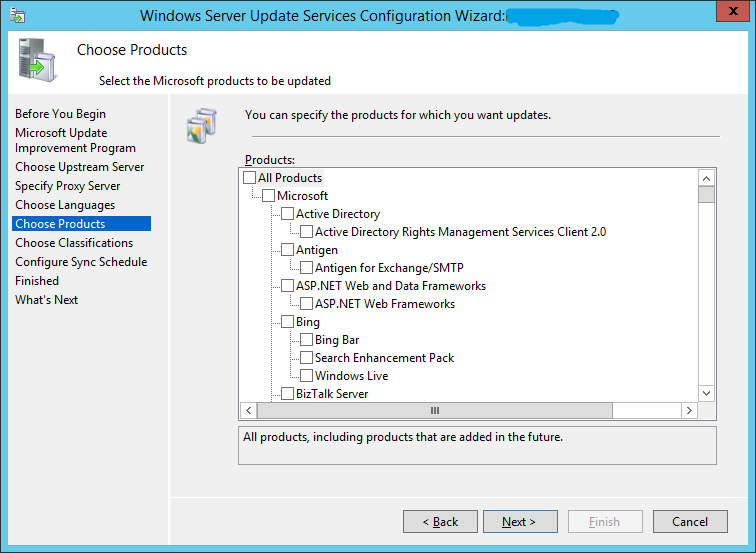
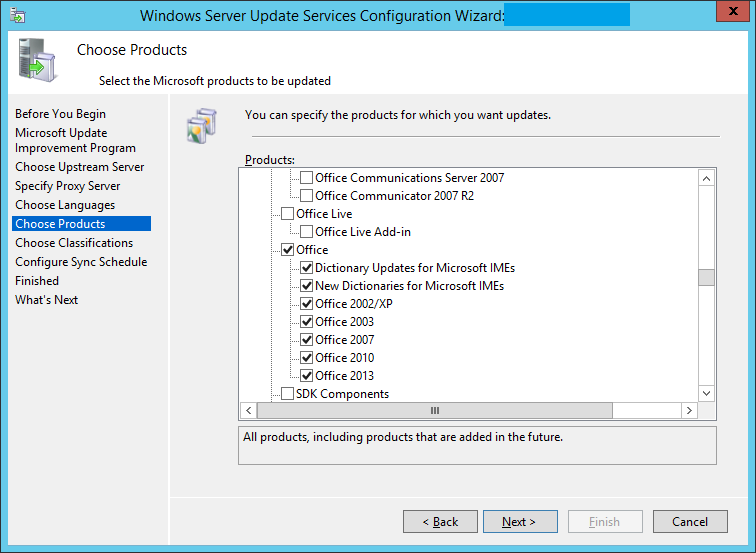
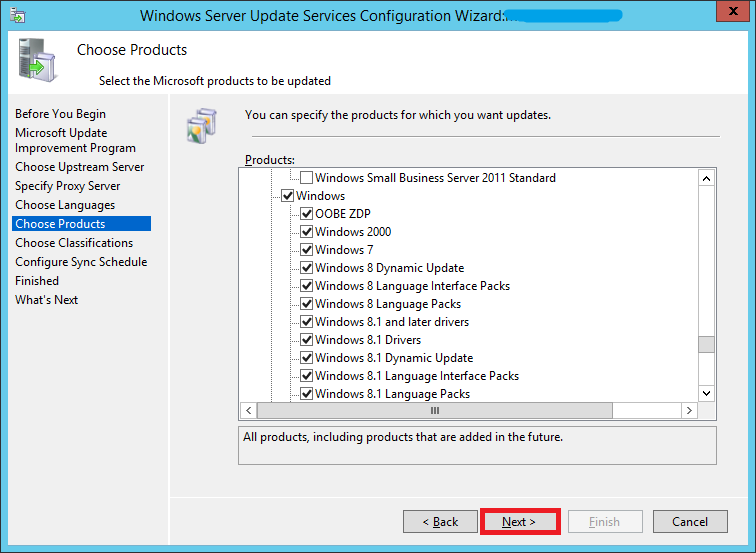
Step 27:
Here you can choose what type of updates you want to subscribe to. Do you want just critical & security updates? Or do you want everything? This is where you can specify that.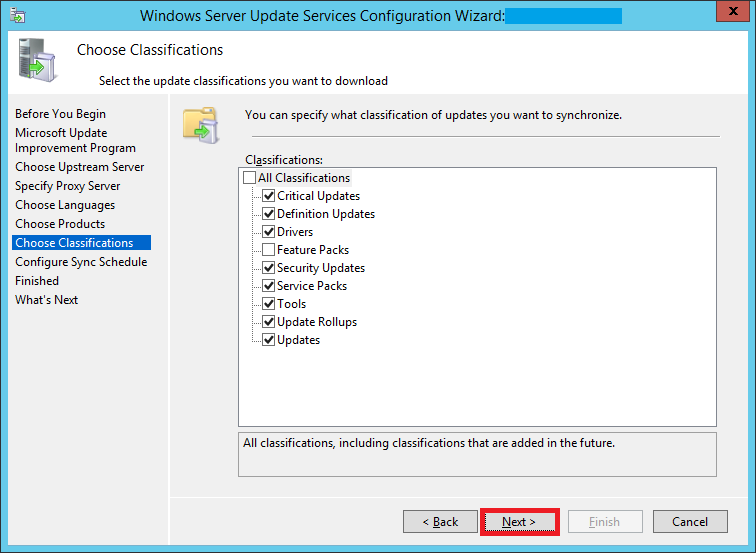
Step 28:
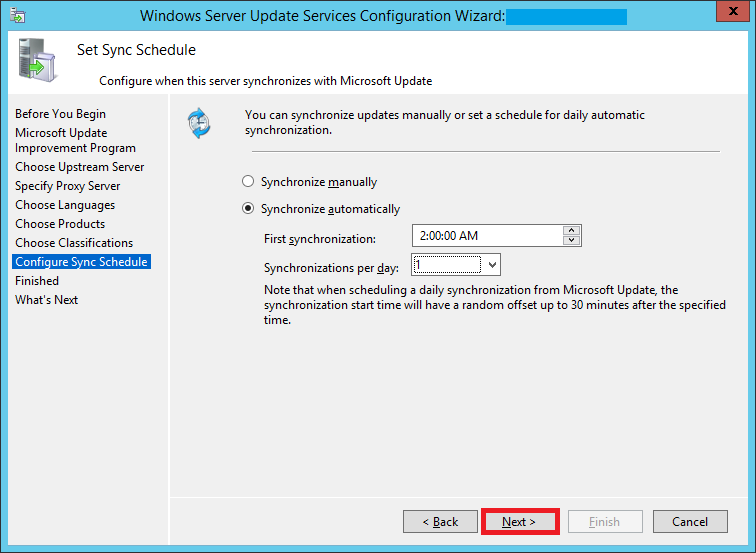
Configure your sync schedule for updates here. The synchronization process involves downloading updates from Microsoft Update or another WSUS server. WSUS determines if any new updates have been made available since the last time you synchronized. If this is the first time you are synchronizing the WSUS server, all of the updates are made available for approval.I chose to automatically sync my server with Microsoft Update daily at 2 AM.
Step 29:
Select Begin initial synchronization to sync with Microsoft Update and click Next and then Finish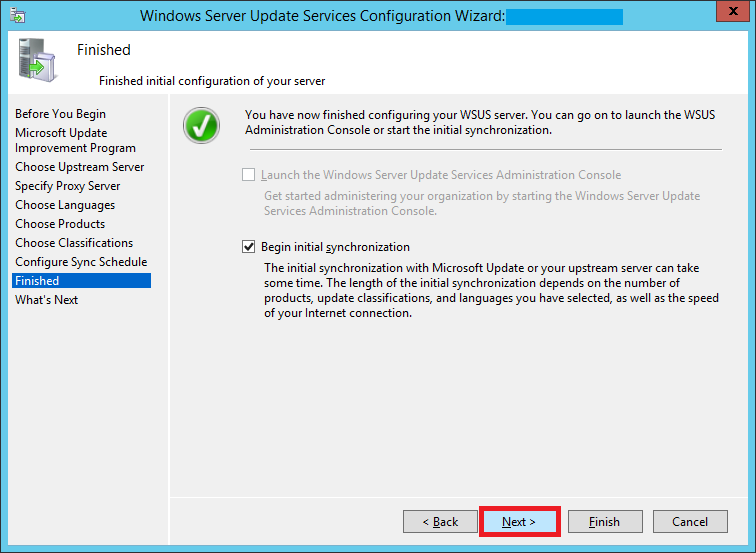

Step 30:
The Update Services console will now launch.This is going to be the place from where you can control everything.
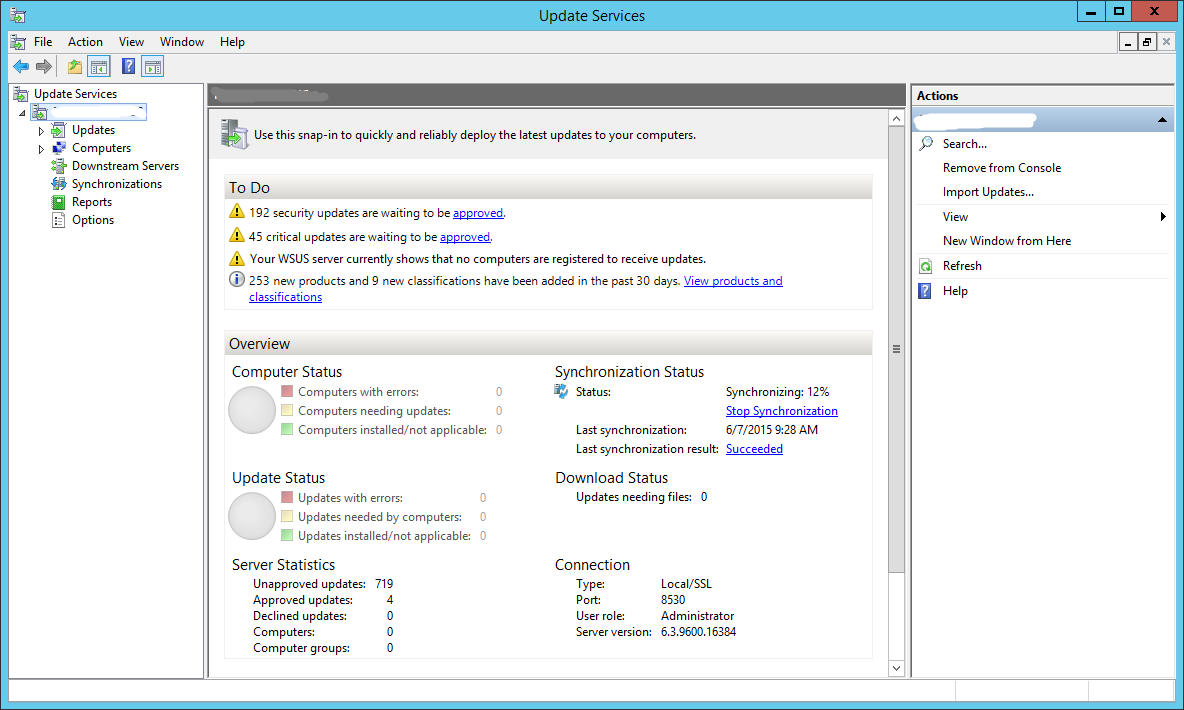
Right now, under the To Do section, you will not see much. Wait for the server to synchronize with Microsoft Update. Once it syncs, you will see information like how many updates are available, how many are approved, etc.
Under the Overview section, you can see the Synchronization Status.

Synchronization status is now 12%
Step 31:
Synchronization is finally complete. You can now see the number of updates that are available to you under the To Do section.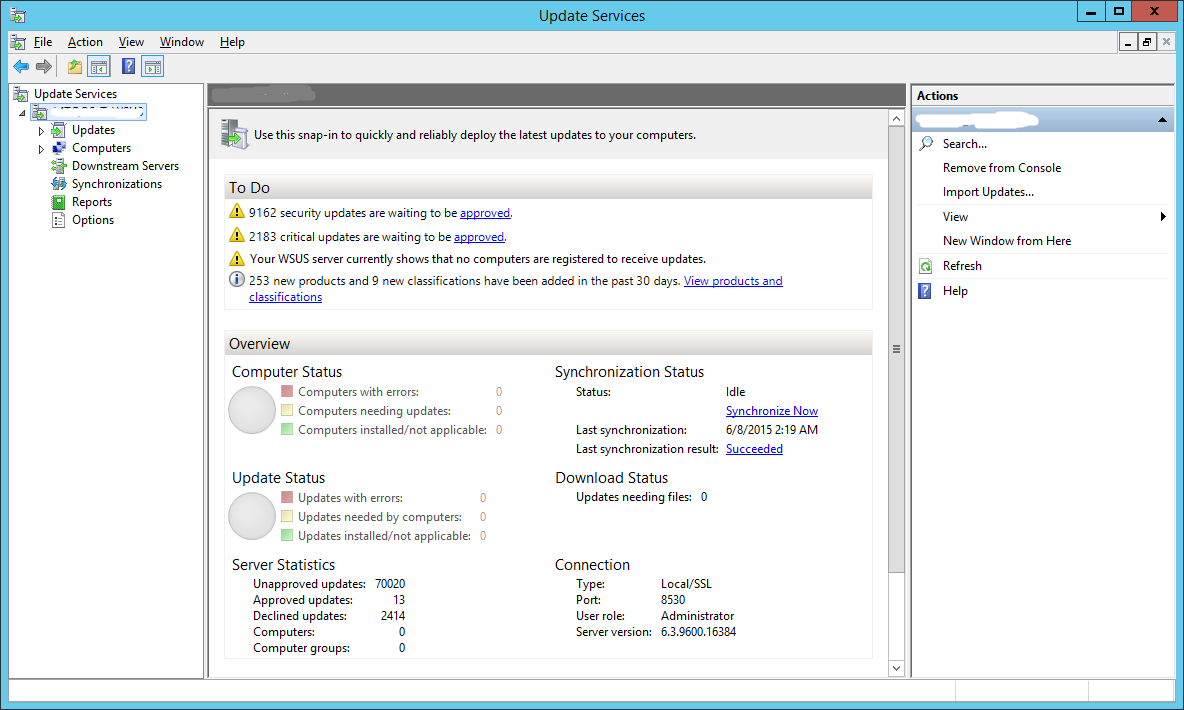
This completes the installation and initial configuration of our WSUS server. However, this server is not going to be much use to you right now. It still isn’t pushing any updates to your workstations still.
Let’s fix that.
Step 32:
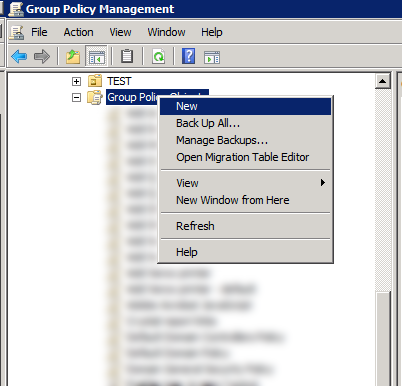
We will be using a GPO to register the workstations on our network with our newly created WSUS server.Fire up your Group Policy Management console. Right-click Group Policy Objects and create a new GPO.
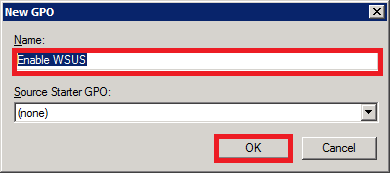
Give it an easy-to-identify name.
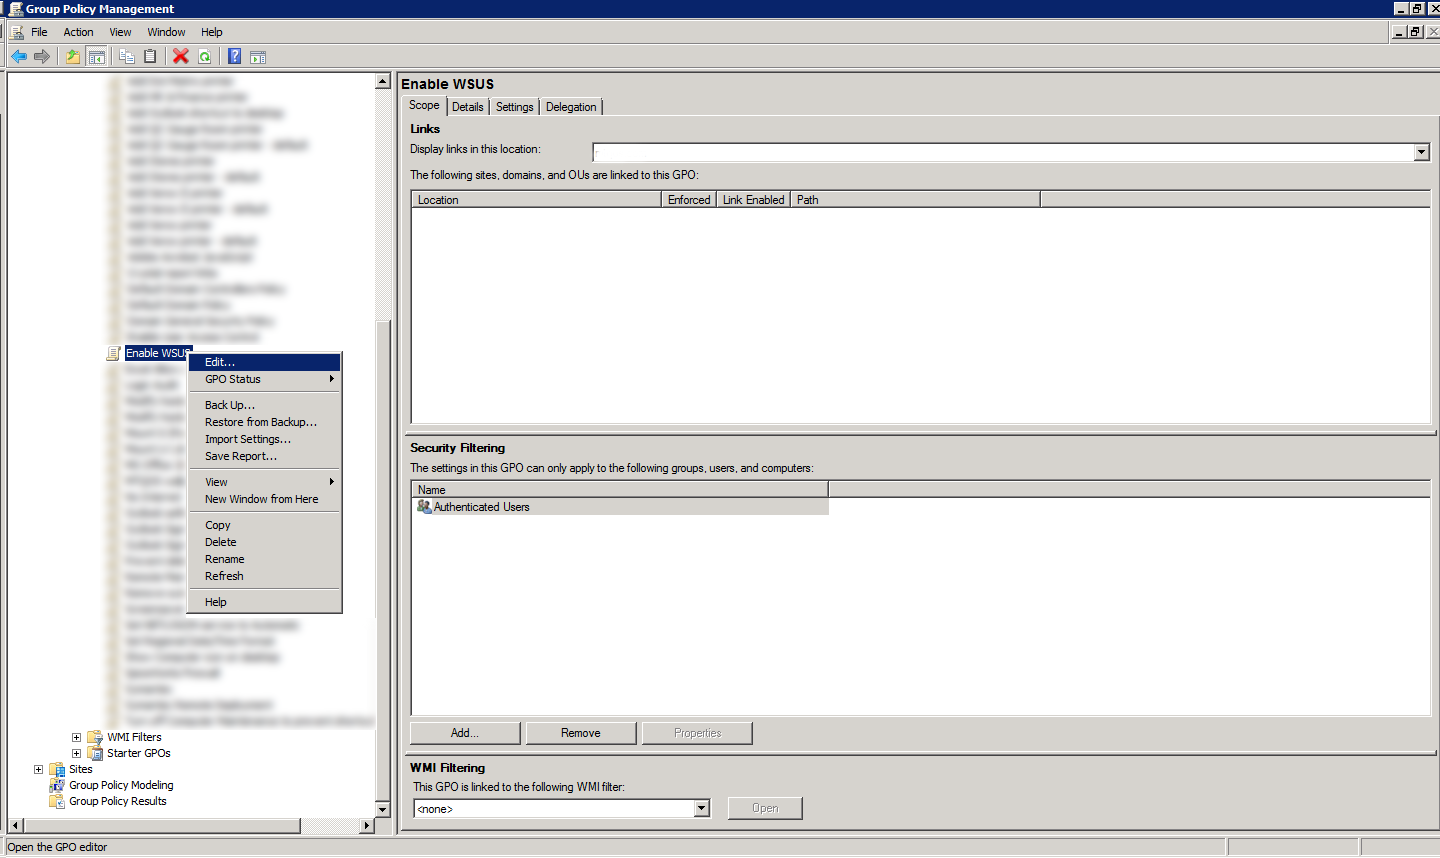
After its created, right-click and choose Edit. We will now configure the GPO.
Step 33:
Expand Computer Configuration > Policies > Administrative Templates > Windows Components > Windows Update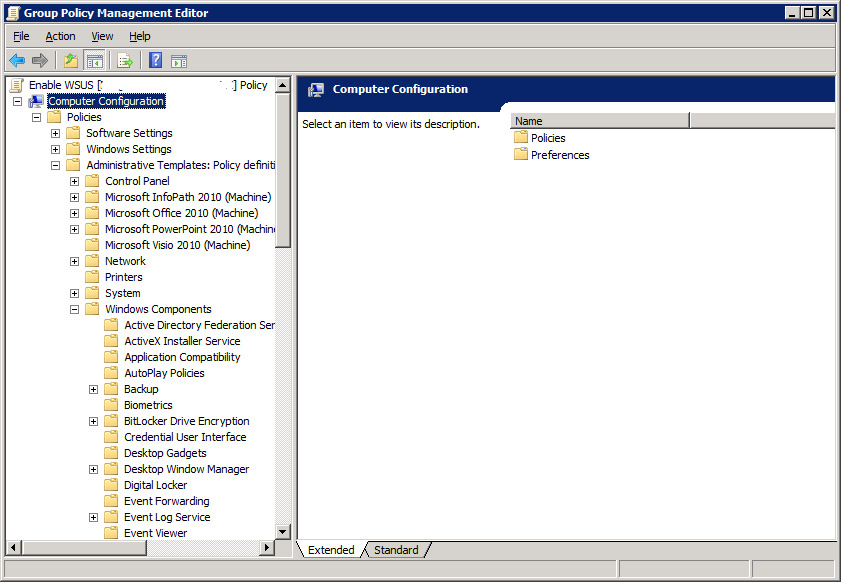
Step 34:
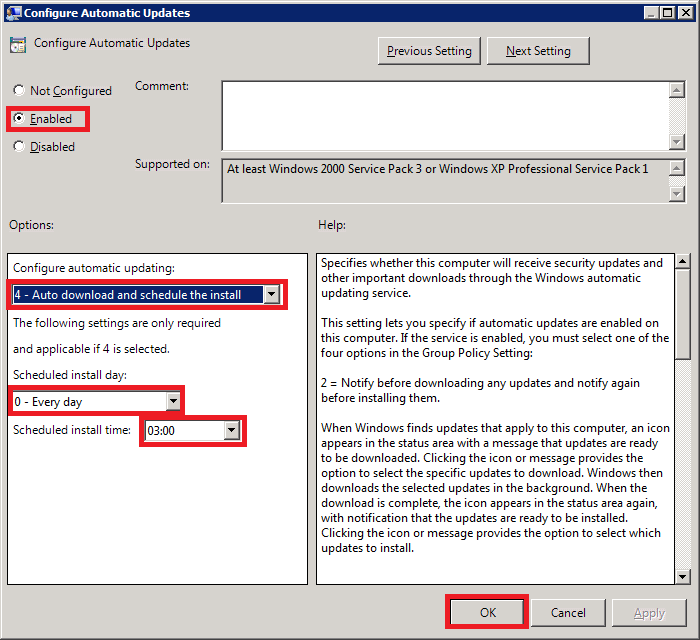
Double-click Configure Automatic Updates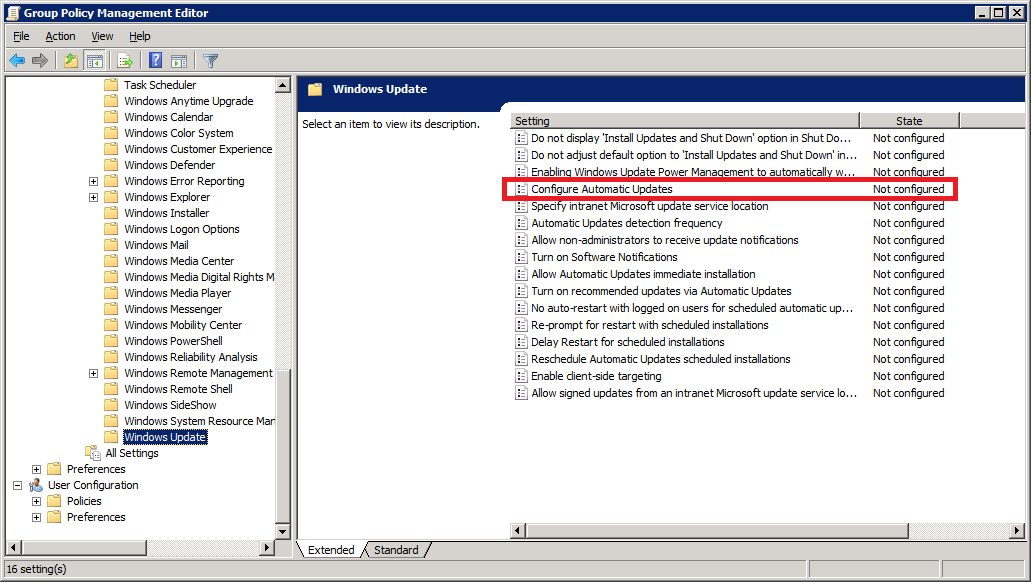
Select Enabled
Under Options, choose how would you want your workstations to update. In my case, I prefer the PCs to download the updates and schedule them to be installed at 3 AM daily.
Once you are satisfied with the options, click OK to exit the screen.
Step 35:
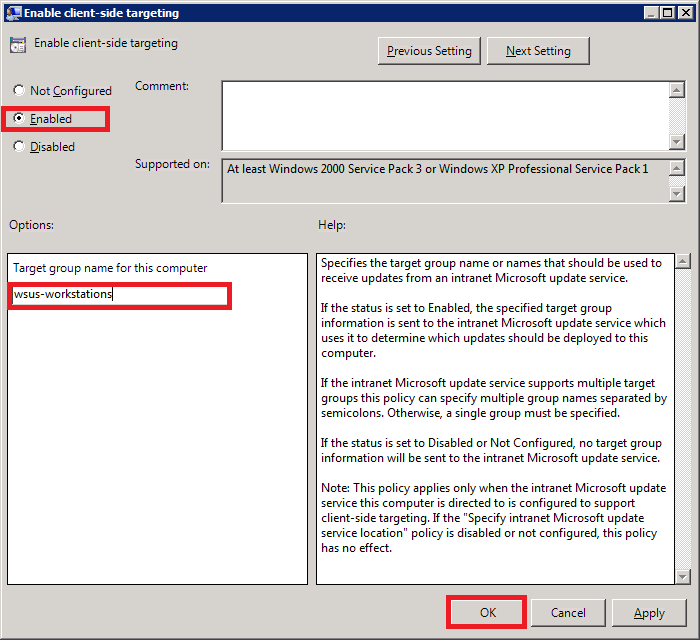
Next, double-click Enable client-side targeting. Configuring this setting will enable the workstations on your network to register directly with your WSUS server (client-side registration).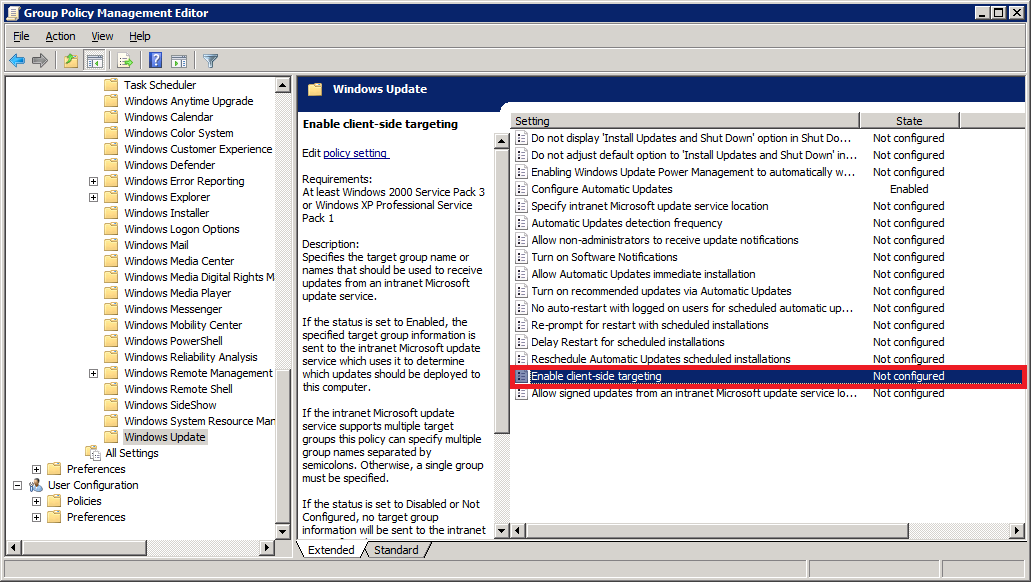
Select Enabled. In the Options area, type the group name for this computer (Your WSUS server can use this information to group computers into different groups. We will see how this is done further below).
Step 36:
Next, double-click on Specify intranet Microsoft update service location. This is where you will specify your WSUS server's address.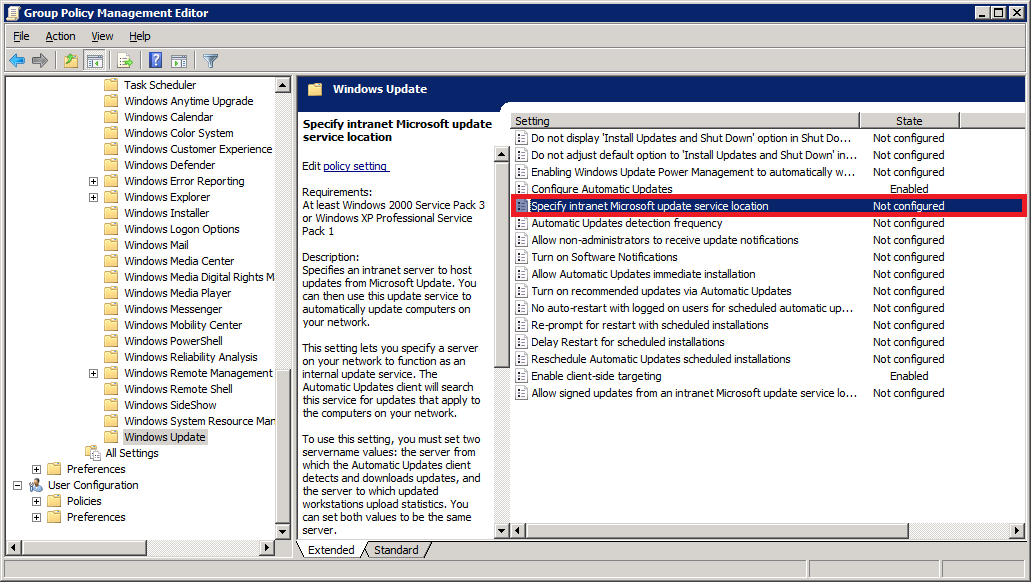
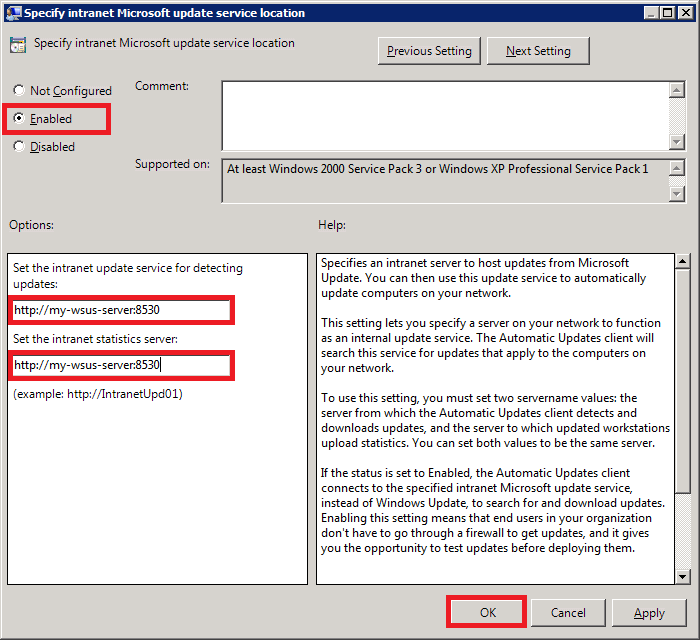
Select Enabled. In the Options area, specify your server name in the form of a URL as shown below.
My WSUS server’s hostname is my-wsus-server. The default port number for WSUS on Windows Server 2012 R2 is 8530, so my complete server address is: http://my-wsus-server:8530
Enter the same URL in both the text boxes and click OK.
Step 37:
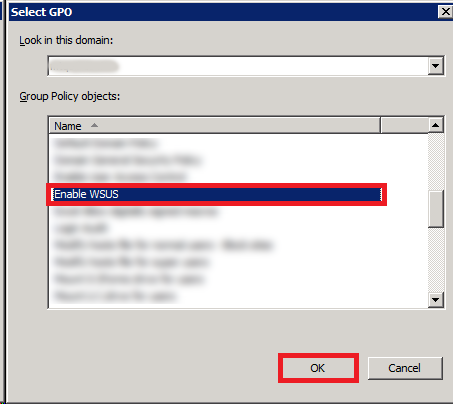
Well, the last step is to link the GPO to an OU. Select an OU which has your test computer. Right-click it and select Link an Existing GPO.
Choose your newly created GPO and click OK.
Step 38:
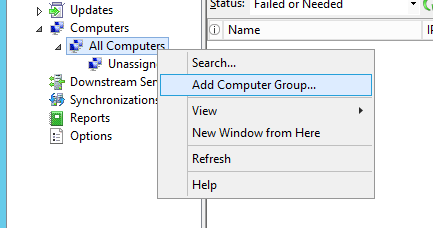
Let's go back to our WSUS server and create a new computer group. By default, under All Computers, you'll see a default group called Unassigned Computers. Any computer that doesn't belong to a group will appear here.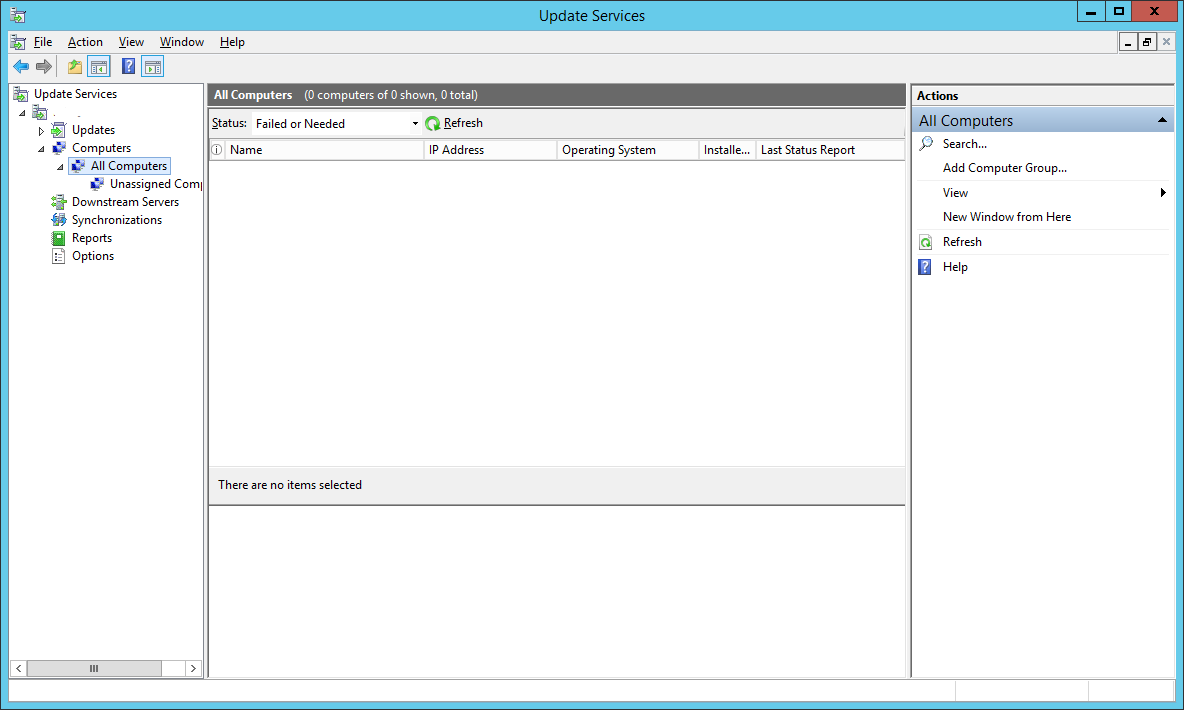
Right-click All Computers and select Add Computer Group…
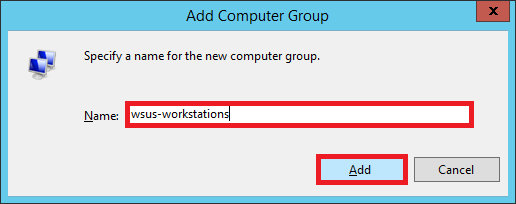
Enter the name of the group. I entered the same group name that I had specified in my GPO (Step 35).
Click Add.
Step 39:
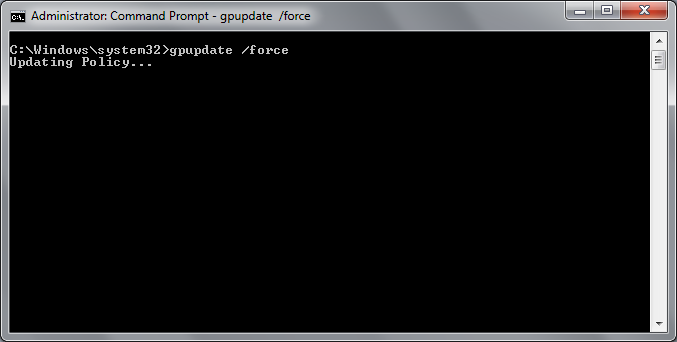
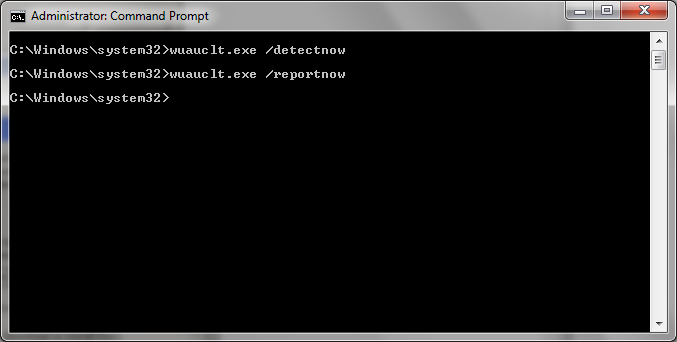
Now, we can either wait for the GPO to be automatically applied to our test computer or, if you are impatient like me, we can speed things up.Log into your test computer.
Open up Command Prompt as Administrator and run 3 commands as shown below.
gpupdate /forcewuauclt.exe /detectnowwuauclt.exe /reportnow
Step 40:
Go back to your WSUS server. Select All Computers group.Hit refresh.
You will see that your test computer has appeared in the list.
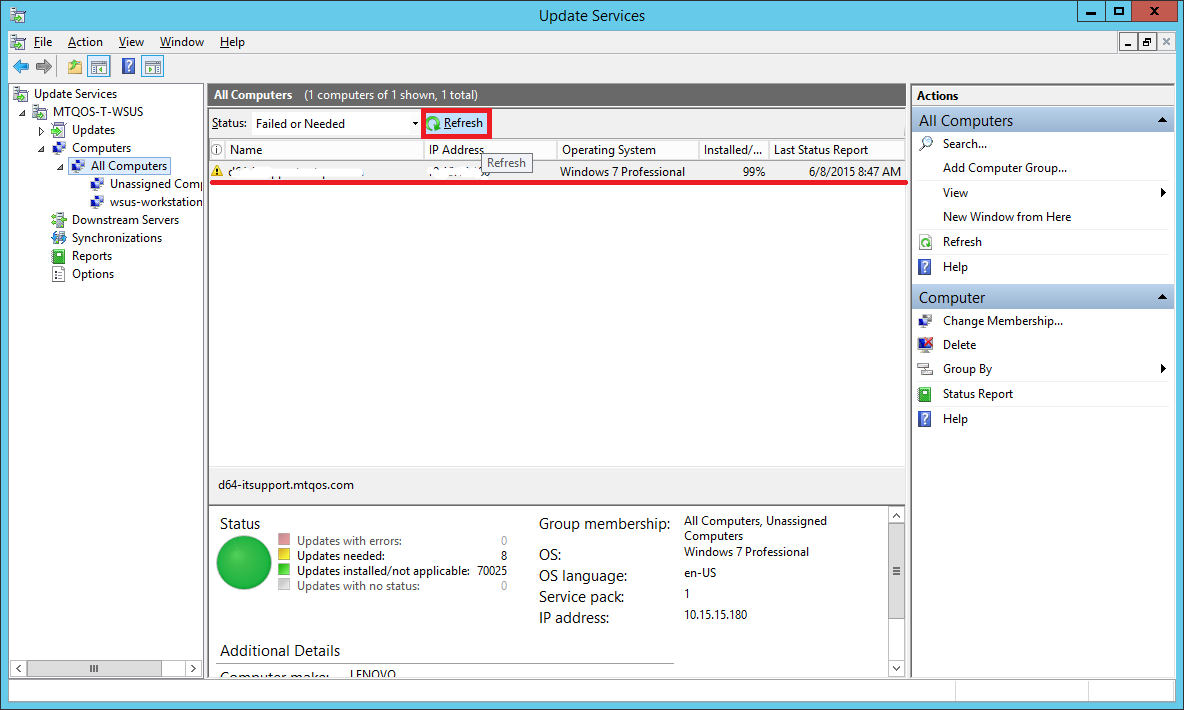
If you don’t see your test computer here, do the following:
- Wait for about 5 minutes and hit Refresh again. Sometimes it takes a while for the PCs to show up even if you have run the above commands.
- Double-check your GPO settings. Make sure you linked it to the correct OU. The OU should have your test computer account and not the user account since it's a Computer Configuration policy.
- Run the commands (specified in Step 39) again on your test computer. Make sure you run them from an elevated command prompt.
- Reboot your test computer.
Step 41:
You will notice that even though you have specified the computer to be added to a group wsus-workstations in the GPO, the test computer still appears under Unassigned Computers.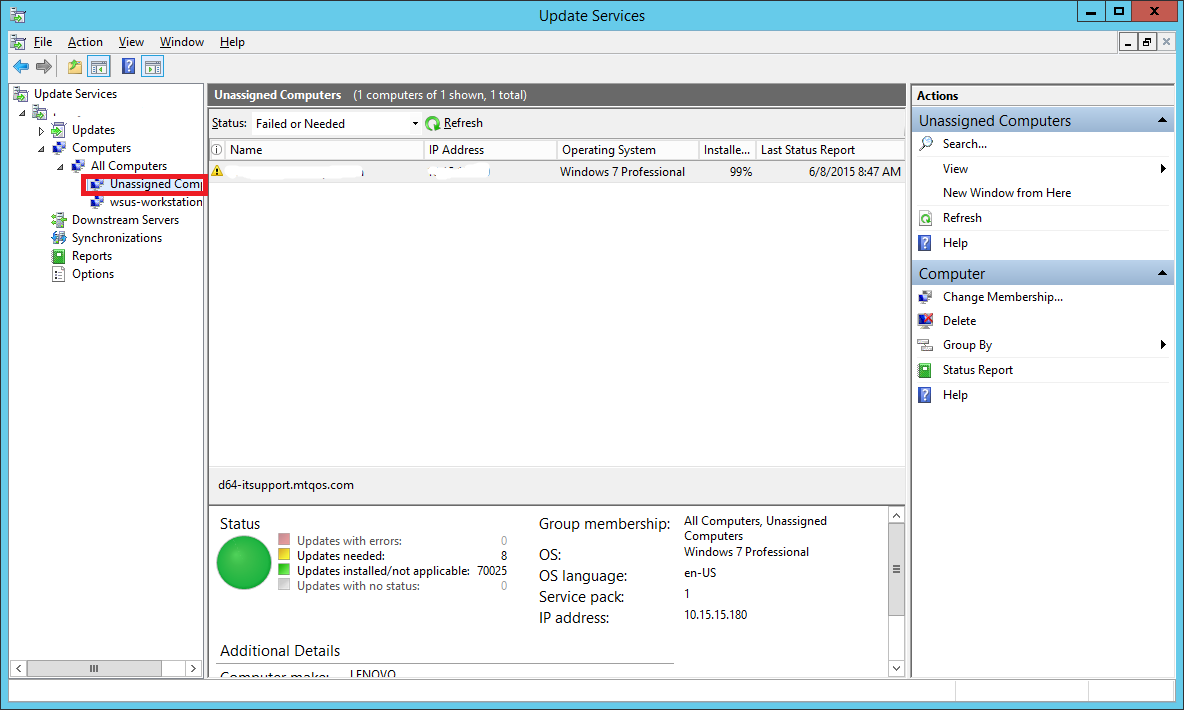
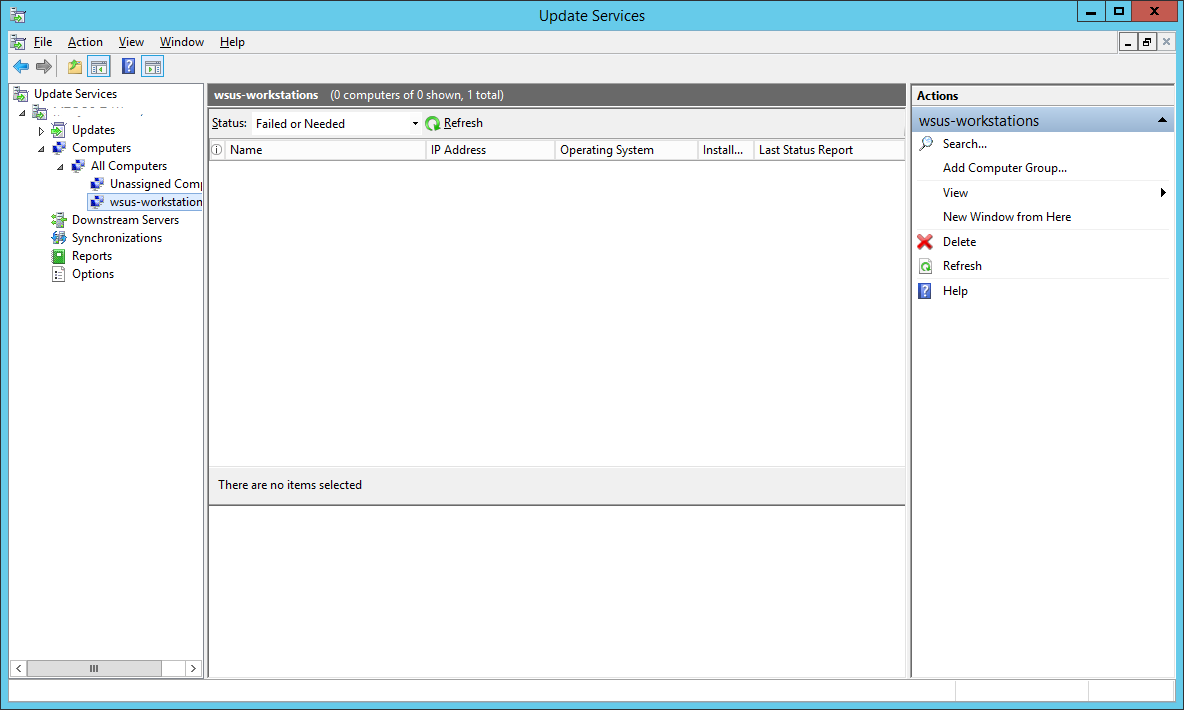
Well, that’s because by default, WSUS ignores the groups and places all discovered computers in the Unassigned Computers group. You can then manually move it to whichever group you want.
You can change this setting. If you want the computers to automatically add themselves to the group specified in the GPO, do the following.
In your Update Services console, select Options. Double-click on Computers
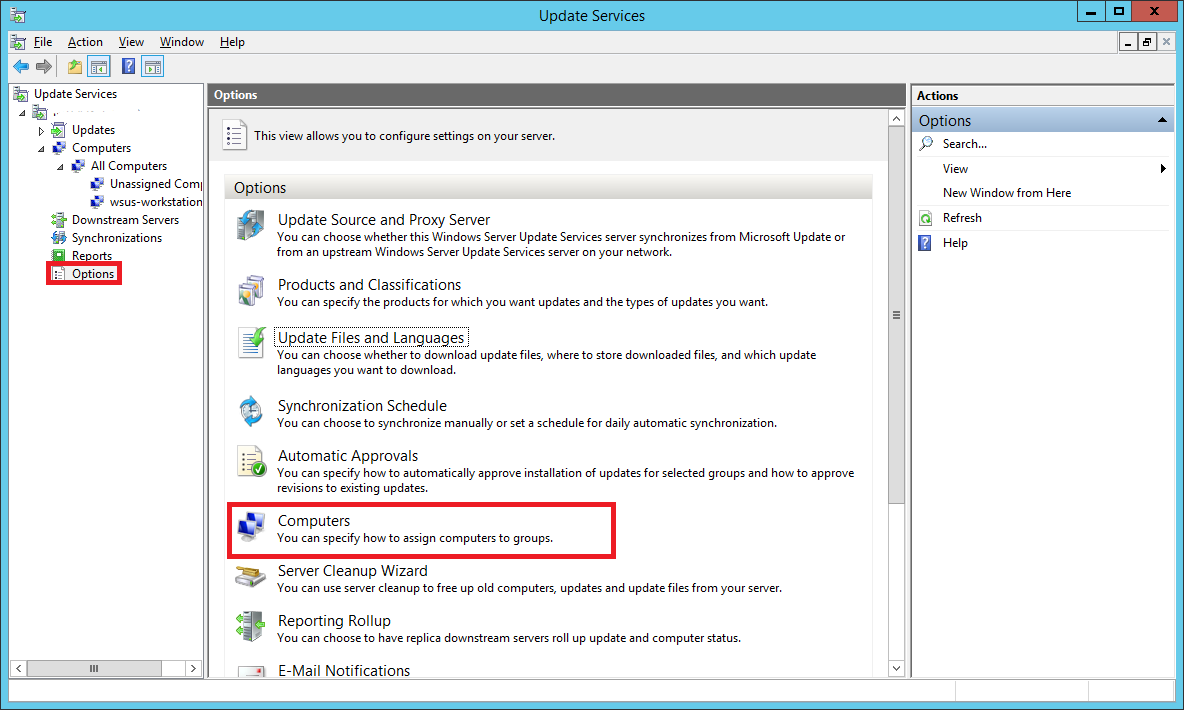
Choose the second option that says Use Group Policy or registry settings on computers.
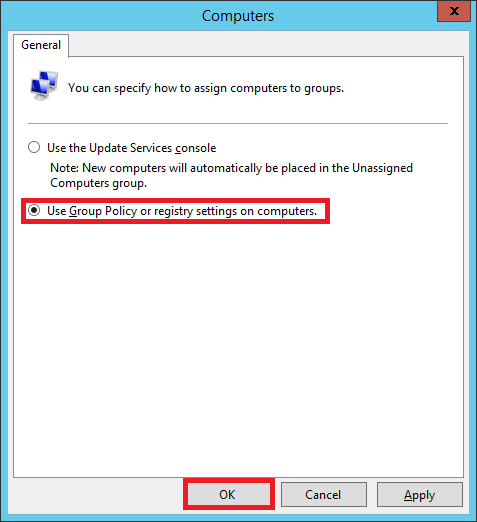
Now any computer that your GPO will apply to, will automatically appear in the group wsus-computers instead of Unassigned Computers.
You can make different GPOs for machines that you want to be grouped differently.
Step 42:
Now, since we have added a test computer, lets see how we can push updates to it.In your WSUS console, expand the Updates tree and select All Updates. You will see updates which are needed and that are not yet approved.
You will have to Approve them so that they can be pushed out to your test computer.
Select the updates you want to approve using the Shift or Ctrl key.
From the Actions sidebar on the right, select Approve… (you can also right-click the selected updates and do the same)
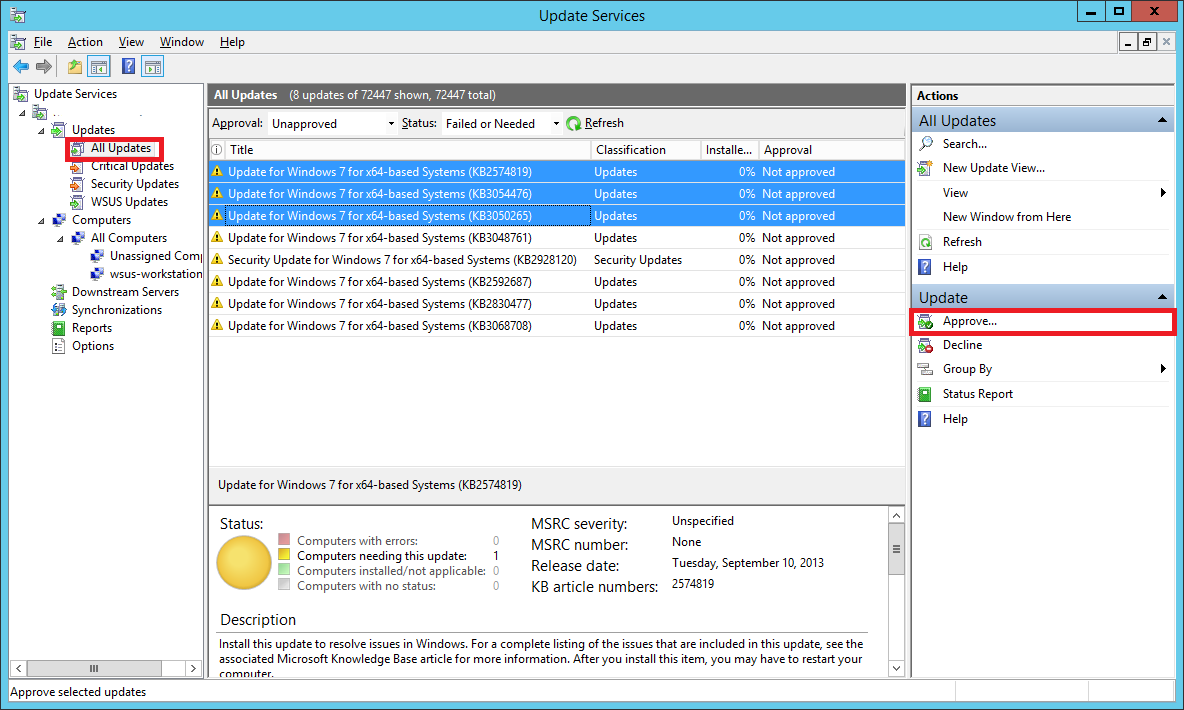
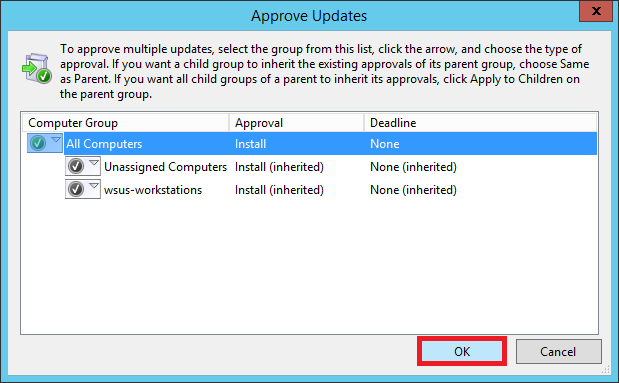
In the window that pops up, right-click All Computers and select Approved for Install.
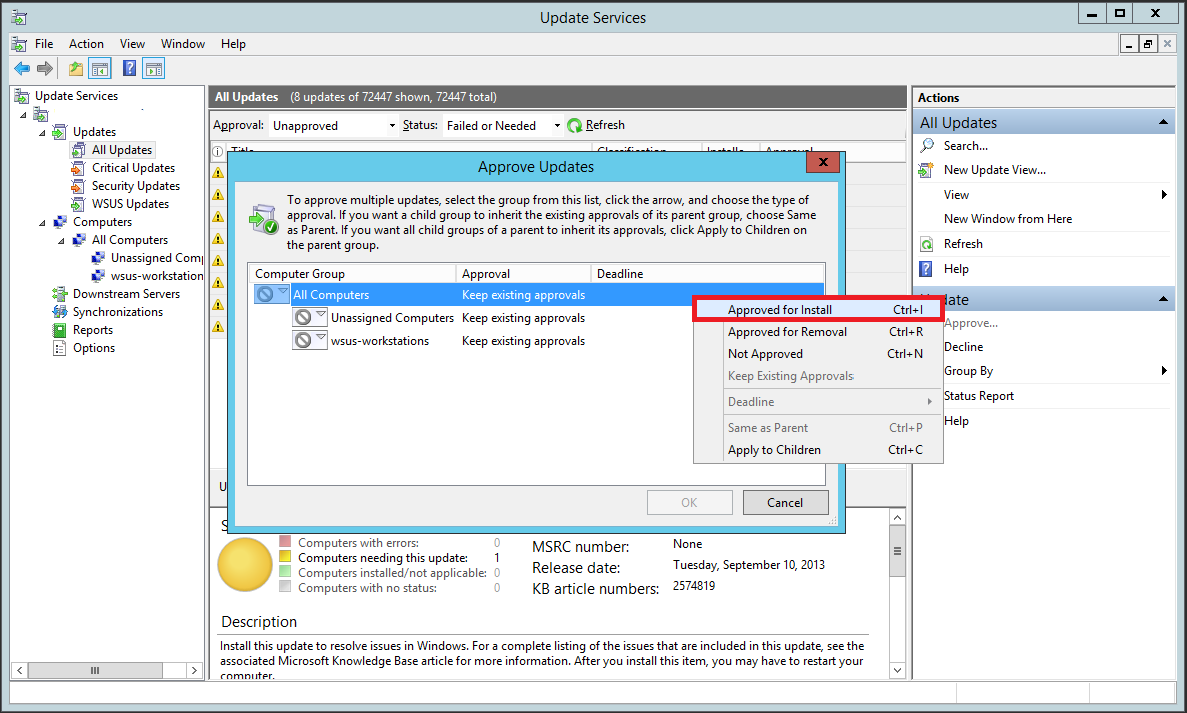
You’ll notice that the updates haven’t been approved for the groups individually. Right-click All Computers again and select Apply to Children. This will approve updates for all the children groups under All Computers.
Since you have just one test computer right now, we have approved it for all the computers. However, in a production environment you should first approve the updates to a test group (instead of all computers) to see if the updates cause any sorts of problems. Once you are certain the updates don’t break anything, you can push it to the critical machines.
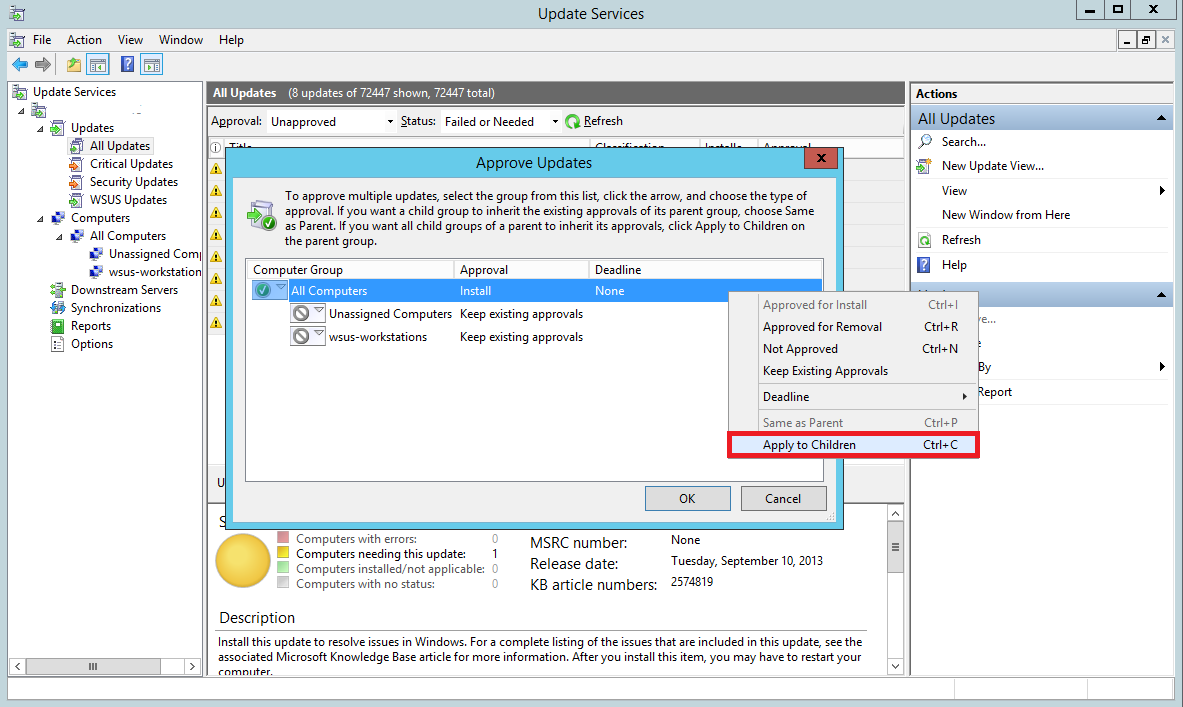
Select OK
The updates have been approved. Now during the scheduled time (3 AM in our case), these updates will be pushed to our test computer.
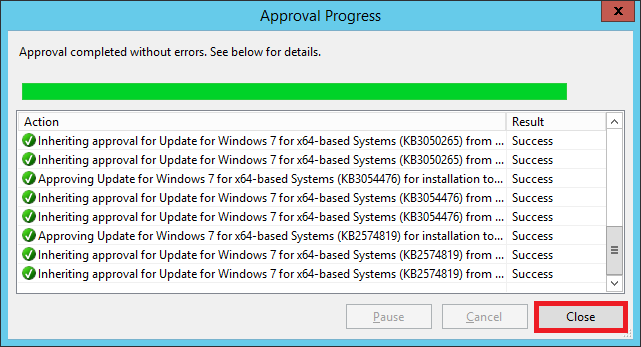
That’s it! Our WSUS server is now set up.
Hope this guide was useful to you. You can leave your feedback in the comments below.
Header photo via rawpixel (CC0)